Article wroted by Ron Ventura at engagewp.com
All the code snippets bellow are to be used in functions.php
Things you’ll need for this tutorial include a Gravity Forms Developer license (includes the payment gateway add-ons needed to accept payment), Advanced Custom Fields Pro (it has the “Repeater” field for creating invoices with multiple products/services) and the Genesis Framework (optional but it will make presentation a lot easier).
Create Invoice Custom Post Type
The first step I want to take is creating the Invoice custom post type. This code registers the Invoice post type without an archive and excluded from search queries on your site. This means that users will need to have a direct URL to access an invoice post.
<?php //* Mind this opening PHP tag

/**
 *	Register Invoice Type
 *
 *	@author     Ren Ventura
 *	@link       http://www.engagewp.com/create-invoices-gravty-forms-wordpress
 */

add_action( 'init', 'rv_invoice_cpt' );
function rv_invoice_cpt() {

	$labels = array(
		'name'               => _x( 'Invoice', 'post type general name', 'engwp' ),
		'singular_name'      => _x( 'Invoice', 'post type singular name', 'engwp' ),
		'menu_name'          => _x( 'Invoices', 'admin menu', 'engwp' ),
		'name_admin_bar'     => _x( 'Invoice', 'add new on admin bar', 'engwp' ),
		'add_new'            => _x( 'Add New', 'Invoice', 'engwp' ),
		'add_new_item'       => __( 'Add New Invoice', 'engwp' ),
		'new_item'           => __( 'New Invoice', 'engwp' ),
		'edit_item'          => __( 'Edit Invoice', 'engwp' ),
		'view_item'          => __( 'View Invoice', 'engwp' ),
		'all_items'          => __( 'All Invoices', 'engwp' ),
		'search_items'       => __( 'Search Invoices', 'engwp' ),
		'parent_item_colon'  => __( 'Parent Invoice:', 'engwp' ),
		'not_found'          => __( 'No Invoices found.', 'engwp' ),
		'not_found_in_trash' => __( 'No Invoices found in Trash.', 'engwp' )
	);

	$args = array(
		'description'			=> __( 'Invoice', 'engwp' ),
		'labels'				=> $labels,
		'supports'				=> array( 'title' ),
		'hierarchical'			=> false,
		'public'				=> true,
		'publicly_queryable'	=> true,
		'query_var'				=> true,
		'rewrite'				=> array( 'slug' => 'invoice' ),
		'show_ui'				=> true,
		'menu_icon'				=> 'dashicons-media-spreadsheet',
		'show_in_menu'			=> true,
		'show_in_nav_menus'		=> false,
		'show_in_admin_bar'		=> true,
		// 'menu_position'			=> 5,
		'can_export'			=> true,
		'has_archive'			=> false,
		'exclude_from_search'	=> true,
		'capability_type'		=> 'post',
	);

	register_post_type( 'invoice', $args );

}
Create Invoice Custom Fields
Next, we need to create some custom fields for the Invoice post type. For this tutorial (and all of my custom field work), I will be using Advanced Custom Fields Pro. There is a free version of Advanced Custom Fields but this particular project will require the Repeater field for adding multiple services to a single invoice.
For this tutorial, I’ve uploaded an importable JSON file for you to quickly import the fields. If you would like to use this file, you can download it from GitHub. That said, let’s walk through creating the fields manually.
Create a field group called “Invoice Fields” or whatever you’d like to name it. In this group, we’ll be creating three fields (key is in parentheses):
Client Name (invoice_client_name) – This is where we’ll add the client’s name.
Client Email (invoice_client_email) – This is where we’ll add the client’s email address.
Invoice Services (invoice_services) – A repeater field that will allow us to add multiple services to each invoice.
Service Name (invoice_service_name) – The title of your service/product.
Service Amount (invoice_service_amount) – Amount to bill client for each service.
Service Quantity (invoice_service_quantity) – How many of each service/product.
Create Invoice Form in Gravity Forms
Up next is to create the form that will be used by your clients to pay an invoice. This is now where we’ll get into Gravity Forms. To begin, create a new form and call it “Invoice” or whatever you prefer. This may be one of the most advanced forms you’ve ever created with Gravity Forms but it’s not too bad. I’m going to break it up into different sections.
Form Editor
In the Form Editor, we need to create five form fields:
- Invoice ID – Add a Hidden field and call it “Invoice ID”. For this tutorial, we will be giving each new invoice a unique title of our choosing. For example, you could prefix your invoices and give them unique number sequences based on date (i.e. ENGWP112914-1 for prefix, date of 11/29/14 and “-1″ for the first invoice of that day). This Gravity Forms field will store the title/id of the invoice. To get this to work, add the following Gravity Forms Merge Tag to “Default Value” under the field’s Advanced tab:{embed_post:post_title}
- Invoice Amount – This can be a simple text field. Under the Advanced tab, give it an admin label of invoice_amount. We also need to enable this field to be dynamically populated so check that box and enter as the parameter name invoice_amount. Also, make it viewable to admin only.
- Client Name – This will be almost the same as the Invoice Amount. However, we need to change the admin label and dynamic population parameter name to client_name. Also, make it viewable to admin only.
- Client Email – Again, the same as before but with client_email . Also, make it viewable to admin only.
- Invoice Total – Finally, this will be a product field (under the Pricing section). In the “Field Type” dropdown, select “Calculation” and paste the invoice_total merge tag in the formula area. The merge tag will look something like {invoice_amount:2} (the 2 is for the field ID). This will set the product’s price to be equal to the Invoice Amount field. In a bit, I’ll show you where this field gets its value from. For now, save your form because we’re ready to move on.
Form Confirmations
This area is optional. You can disable confirmations or just keep the default Gravity Forms confirmation (although I don’t know why you would). I always like to display a confirmation so I’ll set one up. Nothing too fancy here. I’m just going to confirm that payment for their invoice ID was received. This will happen after the client lands back on my site after completing payment in PayPal.
Your payment for Invoice ID <strong>{Invoice ID:1}</strong> was submitted successfully.
Form Notifications
As with the Confirmation, I’ll send a simple notice via email as well so the client has multiple confirmations that the payment was received. For the sake of demonstrating what’s possible with Gravity Forms merge tags, I’ll send a little more information to the client in the email.
{client_name:3},

Your payment was received successfully. Here are your invoice details:

Invoice ID - {Invoice ID:1}
Invoice Amount - {Invoice Total (Price):5.2}
Date Paid - {date_mdy}

If you have any questions, just reply to this email.

Sincerely,
WPGuru.info
Configure the rest of your notifications and you’re ready for the next step.
Connect Form with PayPal
We’re halfway there! Next, we need to get our form working with a payment gateway. Since it’s the most widely used and easiest to set up, I’m going to be using PayPal. You will need to install and activate the Gravity Forms PayPal add-on. Once you’ve done that, the PayPal options you’ll need to access are found under the Form Settings section of your invoice form.
Create a new PayPal feed for the invoice form and enter the required information. Since this initial step is very simple and Gravity Forms provides good help boxes, I’m going to move onto the next part of integrating the form with PayPal.
After you’ve created the feed, you’ll be presented with more options. The most important of these options is the “Payment Amount” field. From this dropdown, you can select “Invoice Total” (our product field) or “Form Total.” Since we only have one product with no options, these two will be the same so it doesn’t matter which one you select. Go ahead and sync up any other field you wish by populating it with the information that should be sent to PayPal and finish up the remaining settings. I suggest not prompting the buyer/client to enter a note or shipping address unless absolutely necessary and to only send notification emails after payment has been received.
Create Single Invoice Template
If you’ve made it this far, you now have an Invoice custom post type with custom fields for client details and invoiced services. You also have a form connected with PayPal to accept payment from the client for the items contained in the invoice. Now, we need to display this invoice and form to the client. To do this, we need to create an invoice template. Since I use Genesis for my development, it’s what I’ll be using to show you the single-invoice.php template I put together for this tutorial.
If you don’t use Genesis, you can still use the important parts but some of the code won’t apply to you (I’ll point out what you can ignore). Your best option would be to copy your theme’s single.php file and rename it single-invoice.php.
To begin, here’s my single-invoice.php template. Take a look and I’ll give a thorough explanation next.
<?php //* Mind this opening PHP tag
/**
* Single invoice template
*
* @author Ren Ventura
* @link http://www.engagewp.com/create-invoices-gravty-forms-wordpress
*/
//* Define running total global variable
$running_total = 0;
//* Remove post info, post meta, breadcrumbs and title (Genesis specific hooks)
remove_action( 'genesis_entry_header', 'genesis_do_post_title' );
remove_action( 'genesis_entry_header', 'genesis_post_info', 12 );
remove_action( 'genesis_entry_footer', 'genesis_post_meta' );
remove_action( 'genesis_before_loop', 'genesis_do_breadcrumbs' );
// Output invoice details
add_action( 'genesis_entry_content', 'rv_invoice_details', 999 ); // (Genesis specific hook)
function rv_invoice_details() {
//* Set variables
$invoice_id = get_the_title();
$name = get_field( 'invoice_client_name' );
$email = get_field( 'invoice_client_email' );
?>
<div class="invoice">
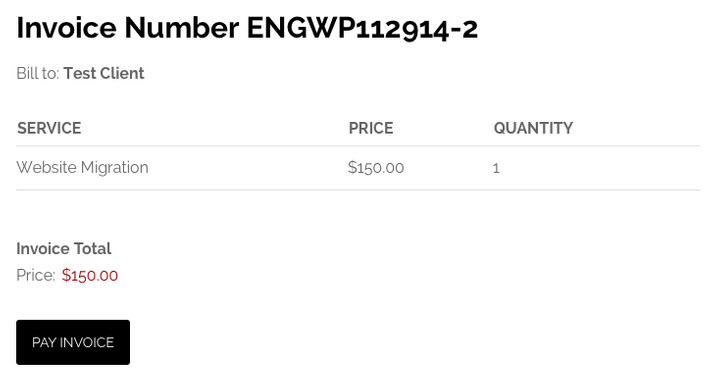
<h2>Invoice Number <?php echo $invoice_id; ?></h2>
<p>Bill to: <strong><?php echo $name; ?></strong></p>
<?php if ( have_rows( 'invoice_services' ) ): //* Start the table if services are listed ?>
<table class="services">
<tr>
<th>Service</th>
<th>Price</th>
<th>Quantity</th>
</tr>
<?php while ( have_rows( 'invoice_services' ) ) : the_row(); ?>
<?php
//* Set repeater variables
$service_name = get_sub_field( 'invoice_service_name' );
$service_amount = '$' . number_format( get_sub_field( 'invoice_service_amount' ), 2 );
$service_quantity = get_sub_field( 'invoice_service_quantity' );
?>
<?php //* Output a details row for each service ?>
<tr class="service">
<td class="name"><?php echo $service_name; ?></td>
<td class="amount"><?php echo $service_amount; ?></td>
<td class="quantity"><?php echo $service_quantity; ?></td>
</tr>
<?php
global $running_total;
$running_total += get_sub_field( 'invoice_service_amount' ) * get_sub_field( 'invoice_service_quantity' );
?>
<?php endwhile; ?>
</table>
<?php else : echo 'No services listed'; ?>
<?php endif; ?>
</div>
<div class="payment-form">
<?php echo do_shortcode( '
' ); ?>
</div>
<?php }
add_filter( 'gform_field_value_client_name', 'gf_filter_client_name' );
function gf_filter_client_name() {
return esc_attr( get_field( 'invoice_client_name' ) );
}
add_filter( 'gform_field_value_invoice_amount', 'gf_filter_amount' );
function gf_filter_amount() {
global $running_total;
return esc_attr( number_format( $running_total, 2 ) );
}
genesis(); // (Genesis specific function)
- On line 10, we’re creating a counter variable to keep track of the invoice total and initializing it to zero.
- Lines 13-16 are Genesis-specific and tidy up some presentational things.
- Lines 23-25 create some additional variables: Invoice ID, Client Name and Client Email.
- Lines 29-81 create the invoice container and table. The table has three columns; one for each of the repeatable service fields we created in step two. Each time you add a new service to the invoice, the counter variable ($running_total) is updated to equal the values from all of the included items.
- Lines 85-89 output the form we created in Gravity Forms to let clients pay the invoice. On line 87, you’ll see the shortcode that outputs the actual form. You will need to update this shortcode so it’s specific to your invoice form.
- Lines 93-96 pre-populate the value attribute of the Client Name field with the Client Name custom field’s value. This dynamic population is the feature that will allow us to use the same form for all of our invoice posts.
- Lines 98-102 pre-populate the value of the Invoice Amount field with the value of our counter variable, which is equal to the sum of every service in the invoice. This counter value is formatted appropriately for currency.
- Finally, line 104 wraps up the Genesis code and is only needed if using this template within Genesis. Remove it otherwise.
Send Email to Client when New Invoice is Created
A nice feature to have is to automatically send an email to the client with a link to the invoice as soon as you publish the invoice. This step is not completely necessary but I’ve included some code specifically for it.
Recall that in step two, we created a Client Email field. We added this field for two reasons: we want to associate the client with an email address and to automatically send an email to them when an invoice is created. Since we set the field to be viewable by the admin only, we need to have it dynamically populated so that the field contains an email when it’s submitted. I chose not to have this field dynamically populated via a filter like Client Name and Invoice Amount because, since these invoices are technically viewable to anyone (don’t worry, not many people are looking to pay other peoples’ invoices), the client’s email would be viewable to anyone who was able to access the invoice and skilled enough to know where to look. Therefore, I’d prefer to populate this field via a query string that is included in the email sent to the client. That way, it would be very simple for the client to populate this field (perhaps without even knowing it) and their email would not be visible to anyone who accessed the invoice.
This snippet composes an email to send to the client after an invoice is generated and sends it to the email we entered when we created it. In the email’s body, it includes a link to the invoice and dynamically appends a query string that will populate the Client Email field. Everything is still just as simple for the client but much safer.
<?php //* Mind this opening PHP tag

/**
 *	Send an email to the invoice_client_email custom field in the Invoice post type
 * 	The acf/save_post hook is specific to the Advanced Custom Fields plugin
 *
 *	@author     Ren Ventura
 *	@link       http://www.engagewp.com/create-invoices-gravty-forms-wordpress
 */

//* Send a notice to the user when CPT is created
add_action( 'acf/save_post', 'send_invoice_notice', 20 );
function send_invoice_notice( $post_id ) {

    if ( 'invoice' == get_post_type( $post_id ) ) {

		// Get client's first name
		$name = get_field( 'invoice_client_name', $post_id );
		$first_name = explode( ' ', $name );

		// Get client's email
		$to = get_field( 'invoice_client_email', $post_id );

		// Get invoice link with client's email passed as query string
		$permalink = trailingslashit( get_permalink( $post_id ) ) . '?client_email=' . $to;

		// Set email subject
		$subject = 'Your EngageWP Service Invoice';

		// Set email message
		$message = 'Hi, ' . $first_name[0] . '. An invoice was just created and assigned to you on EngageWP. Click here to view invoice details: ' . $permalink;

		// Send email
		wp_mail( $to, $subject, $message );

    }

}
Finishing Up
Whew! You think your worn out from following these instructions? Try writing this entire post (over 2,000 words) in one sitting! You’ve now set up a custom invoice system using a simple custom post type, some custom fields and Gravity Forms as your payment processor. Feel free to modify it as you wish. If you come up with any neat additions, please post them in the comments! Thanks for reading.
Leave a Reply